In industrial automation setups, industrial touch screens are key HMI (human-machine interface) parts. How you install them directly impacts how well the equipment runs, how accurate your operations are, and how long the screen lasts. A lot of businesses cut corners on small details during installation, and that leads to problems like unresponsive touch, glitchy displays, and constant breakdowns. These issues don’t just cost you extra for rework—they can slow down production too. This article breaks down practical tips to avoid the most common installation headaches. We’ll cover four main steps: pre-installation prep, the actual installation, commissioning/acceptance, and tips for specific work environments. It’ll help installers spot and steer clear of risks, keep equipment running smoothly, and make your industrial automation setup more efficient.
I. Pre-Installation Prep: Avoid Mistakes Before You Start
Skimping on pre-installation prep is the #1 cause of installation headaches later on. Focus on three key things: picking the right model for your needs, checking the work environment, and inspecting your equipment/tools first. That way, you’ll avoid problems from the get-go.
1. Common Pitfall: Picking the Wrong Model for Your Environment
A lot of folks just pick a touch screen based on size or price, ignoring what the industrial site actually needs. That’s why touch screens keep breaking in hot, humid, dusty, or high-electromagnetic-interference areas. Another big mistake? Not checking the installation dimensions upfront—then you end up with an embedded screen that doesn’t fit the cutout, or wall brackets that don’t match the equipment.
How to Avoid It: ① Match the screen’s specs to your job: For hot areas (like smelting shops), go with models that handle a wide temp range (-4°F to 140°F or higher) and cool down well. For damp spots (like food processing or water treatment plants), choose ones with an IP65 or better waterproof/dustproof rating. For outdoor use, pair it with a high-brightness screen (1000cd/m² or more) and an anti-glare panel so you can see it clearly in direct sun. ② Double-check measurements: For embedded installation, get the equipment’s cutout drawings first to make sure the opening size and bezel thickness fit perfectly. For wall mounts, check the bracket’s weight capacity—it should hold at least 1.5 times the screen’s weight. If you’re mounting on hollow or drywall, add reinforced keels or use through-wall bolts first. ③ Stay away from electromagnetic interference: Don’t put the touch screen near high-interference gear like VFDs (variable frequency drives) or electric motors. If you can’t avoid it, plan shielding ahead of time—like using shielded cables or installing filters.
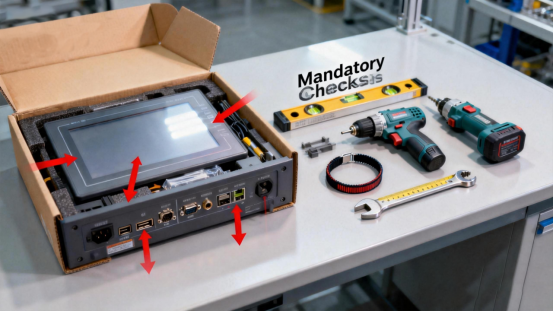
2. Common Pitfall: Forgetting to Check Equipment & Tools
A lot of people install the screen right after unpacking it, without checking if it’s damaged or if parts are missing. Then they find scratches, cracked screens, broken ports, or missing screws/brackets after it’s already installed. Another issue? Not having the right tools—like using a regular drill on concrete walls, which just ruins the drill or the wall.
How to Avoid It: ① Do a thorough unpacking check: After opening the box, first look for scratches or cracks on the screen and make sure all ports work. Then check that all accessories—manual, screws, brackets, cables—are there. ② Test the screen before installing: Hook up the power and basic control lines first to make sure the display works and the touch is responsive. This saves you the hassle of taking it down later if the screen itself is faulty. ③ Get the right tools and supplies: Pick tools based on the wall type (use a hammer drill for concrete, self-tapping screws for wood). Have essentials on hand: levels, tape measures, pencils, wrenches, anti-slip gloves, and dust masks. Make sure consumables like junction boxes and expansion tubes fit the equipment.
II. Core Installation Steps: Avoid Big Problems with Small Details
Unsafe or sloppy installation can easily cause issues like loose equipment, bad connections, or static damage. Focus on three key steps: mounting it right, wiring it correctly, and protecting against static.
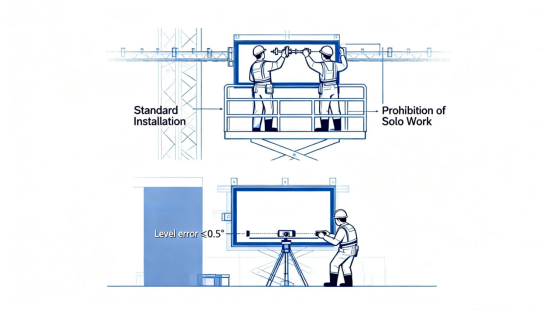
Using too few mounting points or not tightening screws all the way—this makes the equipment shake when it’s running, which messes up touch accuracy. Another mistake? Not using a level during installation, so the screen is tilted. That causes eye strain and makes operations harder. And don’t forget safety for high-altitude installs—working up high without protection is a big risk.
How to Avoid It: ① Mount the bracket correctly: Use at least 4 mounting points to spread the weight evenly. Make sure expansion screws are fully pushed in, and give the bracket a light push after tightening to make sure it’s not loose. ② Level the screen properly: Adjust it back and forth with a level when attaching the bracket—make sure it’s horizontal both ways, and the center is at or slightly below the operator’s line of sight (5-6 feet for standing, 4-5 feet for sitting). ③ Prioritize safety for high installs: Use stable ladders or scaffolding, and always work with a partner (one holds the screen, the other does the installing). Don’t climb risky spots—safety comes first.
2. Common Pitfall: Wiring Mistakes or Loose Connections
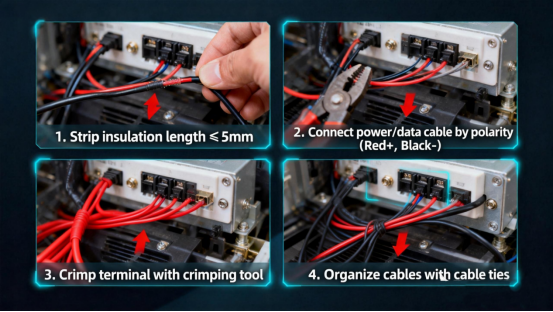
Wiring blunders like reversing positive and negative poles on power or data cables, or stripping too much insulation (which causes short circuits). Loose data cables lead to bad connections and lost communication. And a big one: not checking voltage specs first—plugging it straight into 110V mains (U.S. standard) can burn out the screen if it’s not made for that.
How to Avoid It: ① Follow wiring rules closely: Turn off power before wiring. Use wire strippers to remove just enough insulation—only expose the metal part you need. Check the manual to tell positive and negative poles apart, and make sure connections are tight to avoid short circuits. ② Protect the wiring: Use shielded cables for communication lines (like RS-232, RS-485, Ethernet), keep them away from high-voltage lines, and secure them with cable ties after wiring so they don’t pull loose. If the screen works with multiple communication protocols, confirm and set the right one first. ③ Check voltage first: Use a multimeter to test the voltage before hooking up power—make sure it’s within the screen’s specs (for example, some industrial touch screens use DC 24V±10%, so don’t plug them straight into 110V mains).
3. Common Pitfall: Ignoring Grounding & Static Protection
Not grounding the screen properly—that builds up static electricity and fries touch ICs and driver circuits, leading to touch drift or unresponsive screens. Another mistake: not taking anti-static measures during installation, like touching screen cables or driver ICs directly with your hands. That causes permanent damage you can’t fix.
How to Avoid It: ① Ground it correctly: Make sure the touch screen’s metal frame, bracket, and connected controller are properly grounded. The grounding wire should be thick enough to meet safety standards, and the grounding resistance should stay within the specified range to avoid static interference and lightning damage. ② Use anti-static measures: Installers need to wear anti-static wristbands and gloves to avoid touching sensitive parts like screen cables and driver ICs directly. If possible, work in an area with an anti-static floor. For dry environments, add a little humidity to cut down on static buildup.
III. Commissioning & Acceptance: Check Everything Before You Use It
Commissioning and acceptance after installation are your last chance to catch problems. A lot of people rush through this step to get the equipment up and running, but that leads to frequent breakdowns later.
1. Common Pitfall: Rushing Through Commissioning
[Common Pitfall] Only testing basic display and touch functions, failing to check heat dissipation, communication stability, and extreme operation responses, leading to problems such as overheating shutdowns and data transmission interruptions after the equipment has been running for a period of time.
[Pitfall Avoidance Tips] ① Comprehensive function testing: After power-on, sequentially check if the screen display (no black screens, flower screens, or abnormal reflection), touch accuracy (no drift or dead zones for multi-touch), and button functions (if any) are normal; test the communication stability with equipment such as PLCs and VFDs, and the accuracy of data transmission. ② Focus on heat dissipation performance testing: After turning on the machine for 30 minutes, touch the back and bezel of the machine to confirm no abnormal overheating and no blockage of heat dissipation channels; if installed in a closed cabinet, confirm that the cooling fan is working normally. ③ Extreme scenario simulation: Simulate conditions such as vibration and voltage fluctuations in industrial scenarios to test equipment stability; for outdoor models, test display clarity and waterproof performance under conditions such as direct sunlight and rainy days.
2. Pitfall Point: Missing Acceptance Documentation
[Common Pitfall] Failure to retain installation records, commissioning parameters, and product instruction manuals after acceptance, making it impossible to trace installation details during subsequent maintenance and increasing the difficulty of troubleshooting.
[Pitfall Avoidance Tips] ① Improve acceptance documentation: Record details such as installation time, installers, wall materials, fixing methods, wiring specifications, and commissioning parameters in detail; organize and file materials such as product instruction manuals, warranty cards, and accessory lists uniformly. ② Formulate maintenance specifications: Hand over daily maintenance points to the user, such as avoiding frequent power on/off (wait at least 5 seconds before powering on again), cleaning with a dry soft cloth after power off (avoiding liquid entering the equipment), and disconnecting power and network cables during thunderstorms.
IV. Scenario-Specific Pitfall Avoidance Tips for Industrial Applications
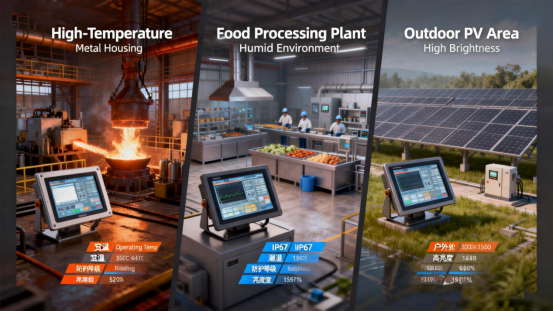
1. High-Temperature Smelting/Forging Scenarios: Focus on Avoiding Heat Dissipation and High-Temperature Aging Risks
[Scenario Characteristics] Ambient temperature can reach above 140°F, with a lot of dust and high-temperature radiation. Equipment is prone to overheating shutdowns, housing aging, and interface desoldering.
[Scenario-Specific Pitfall Avoidance Tips] ① Model Upgrade: Prioritize industrial-grade touch screens with a wide temperature range of -4°F to 158°F, equipped with metal heat dissipation housings and built-in cooling fans. Avoid plastic housing models; select high-temperature resistant Corning glass for the screen protective glass to prevent high-temperature deformation. ② Installation Protection: Keep at least 5 feet away from heat sources such as furnaces and heating ovens. If unavoidable, add high-temperature resistant heat shields, reserve more than 12 inches of heat dissipation space, and ensure no obstruction of heat dissipation air ducts; avoid fully sealing the cabinet during embedded installation, and open heat dissipation holes on the side of the cabinet with dust screens. ③ Wiring Protection: Use high-temperature resistant silicone cables, add high-temperature protective sleeves at interfaces to avoid short circuits caused by melting of wire insulation layers due to high temperatures; regularly inspect wiring terminals to prevent poor contact caused by high-temperature oxidation.
2. Humid Food Processing/Water Treatment Scenarios: Focus on Waterproof Sealing and Corrosion Protection
[Scenario Characteristics] Ambient humidity ≥85%, with a lot of water vapor, detergent residues (food processing), or corrosive liquids (water treatment), which can easily lead to equipment short circuits and rusting of metal components.
[Scenario-Specific Pitfall Avoidance Tips] ① Core Model Selection: Must select industrial touch screens with an IP67 or higher waterproof and dustproof rating, supporting front washing; prioritize capacitive touch methods to avoid unresponsive touch of resistive touch screens due to water vapor infiltration. ② Sealing Reinforcement: For embedded installation, fill the gap between the equipment and the cabinet opening with food-grade waterproof sealant (food processing scenarios) or corrosion-resistant sealant (water treatment scenarios) to prevent water vapor and corrosive liquids from infiltrating; for wall-mounted installation, select stainless steel brackets to avoid equipment falling due to rusting of ordinary carbon steel brackets. ③ Wiring Specifications: All interfaces use waterproof aviation plugs, and tighten the sealing nuts after wiring; adopt a downward-bending “drip loop” design for cable routing to prevent water vapor from infiltrating the interface along the cable.
3. Outdoor Solar PV/Warehousing Scenarios: Focus on Solving Glare and Lightning Strike Risks
[Scenario Characteristics] Long-term exposure to direct sunlight, with problems such as glare, UV aging, and lightning strikes in thunderstorms, which can easily lead to unclear display, screen aging, and circuit burnout.
[Scenario-Specific Pitfall Avoidance Tips] ① Model Adaptation: Select high-brightness anti-glare touch screens with a brightness of ≥1500cd/m², with AG anti-glare treatment on the screen surface to reduce sunlight reflection; select UV-resistant ABS materials for the housing to prevent cracking after long-term exposure. ② Installation Protection: Install in a location avoiding direct noon sunlight, or add sunshades; lightning protection grounding must be done for outdoor installation, and the touch screen’s metal frame and bracket must be reliably connected to the grounding system with a grounding resistance ≤4Ω; add surge protectors at the power end to prevent transient high voltage caused by lightning strikes from damaging the equipment. ③ Commissioning Points: After installation, test display clarity under different lighting conditions, adjust the screen’s automatic brightness adjustment function to ensure clear display even in strong light; test if the touch function is normal after rain washing.
4. High Electromagnetic Interference Machine Tool/VFD Scenarios: Enhance Shielding and Grounding Protection
[Scenario Characteristics] There are many strong electromagnetic interference sources such as machine tools, VFDs, and servo motors around, which can easily lead to touch drift, screen flower screens, and communication interruptions of touch screens.
[Scenario-Specific Pitfall Avoidance Tips] ① Key Model Selection: Select industrial touch screens with EMC electromagnetic compatibility certification (complying with IEC 61000-4 series standards) and built-in anti-interference circuits, and ensure compliance with FCC (Federal Communications Commission) regulations. ② Installation Isolation: Keep the touch screen at least 3.3 feet away from interference sources. If space is limited, add metal shields; use twisted-pair shielded cables, with single-ended grounding of the shield (grounding resistance ≤4Ω) to avoid circulating current caused by double-ended grounding. ③ Wiring Optimization: Separate power lines and communication lines to avoid parallel routing; when cross-routing between VFD/machine tool control lines and touch screen cables, use 90° vertical crossing to reduce electromagnetic coupling; add EMI filters at the touch screen power end to further suppress electromagnetic interference.
V. Summary: Core Principles of Industrial Touch Screen Installation Pitfall Avoidance
The core of industrial touch screen installation pitfall avoidance lies in “precise pre-installation adaptation, standardized mid-installation operations, comprehensive post-installation commissioning, and scenario-specific protection.” Each link must take into account environmental adaptability, equipment compatibility, and operational safety. It is recommended to select products with industrial-grade certifications (such as complying with IEC 61000-4-2 ESD immunity standards, EMC electromagnetic compatibility certification, and UL/FCC certifications) and strictly follow the industrial touch screen installation manual and industry standard operations. For complex industrial scenarios (such as high-temperature smelting, strong electromagnetic interference, outdoor solar PV, etc.), consult manufacturers in advance to customize exclusive industrial touch screen installation plans to reduce risks from the source.
Effectively avoiding pitfalls in industrial touch screen installation not only ensures stable operation of industrial touch screen equipment but also extends service life and reduces maintenance costs, building a solid core defense line for human-machine interaction in industrial automation production.